SEARCH FOR MORE HERE

Friday, December 28, 2012

How to Make a Cribbage Board

How to Make a Cribbage Board


Editor’s note: This is a guest post by Ethan Hagan from One Project Closer.

I love a good card game, and some of my favorites include Spades, Hearts, Hand and Foot, and Euchre. Poker, however, never quite goes my way. Believe it or not, I’ve never played cribbage before. However, when Brett challenged me to make a cribbage board, I thought it would be a lot of fun.

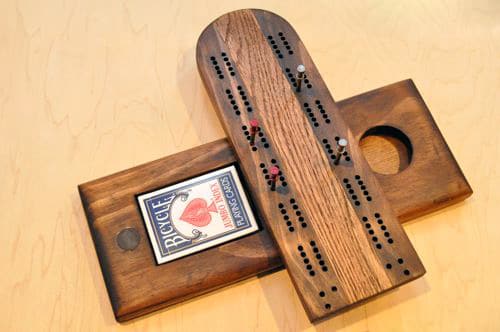
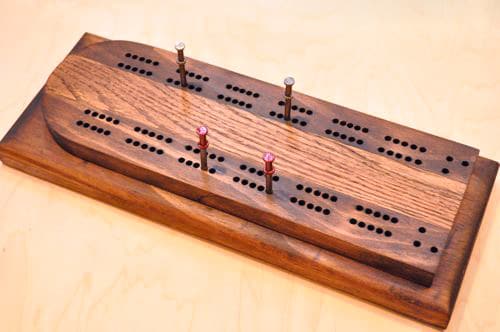
I started reading up on Cribbage rules and found a lot of custom-made boards on the web. I decided on a “classic style” board that follows a design I found on other woodworking sites, and it’s perfect for a moderately skilled woodworker like myself. The board has enough holes to play a 61 point game, as opposed to a 121 point game.
Tools and Materials

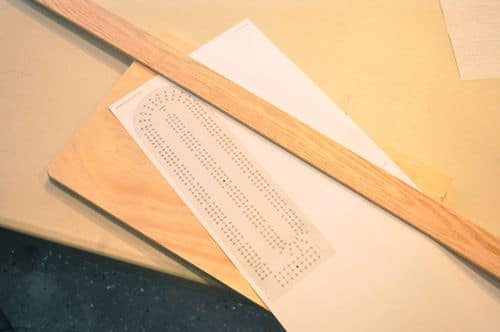
To make my crib board I used some scrap 3/4″ pine, 1/4″ plywood, and I purchased some oak from the local DIY center. I printed out a hole template, which I modified to meet my needs. The pegs are made from double-headed nails, which you’ll typically see used to make concrete forms. The two magnets and wood stain are leftovers from other projects.


Pine is a soft wood so it wouldn’t have been too difficult to cut by hand, and by omitting a few steps, the only necessary power tool is a drill press. I have the tools (so I took advantage of them), and here’s what I used.
Table saw
Dado stack
Coping saw
Palm router
Table router
Drill press
Sandpaper
Angle grinder
Bench grinder

Make a Custom Cribbage Board


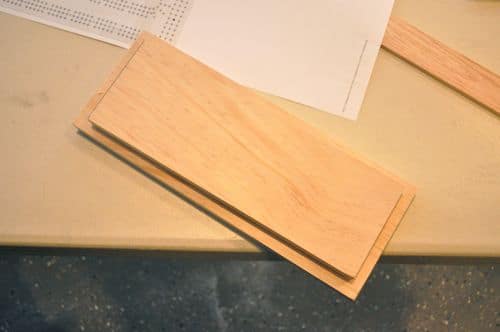
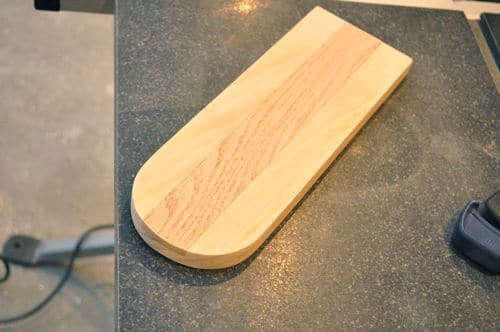
I started by running my pine through a table saw to create two pieces. The top measured 4 x 12″ and the base measured 5-1/8 x 13-1/4″. I also ripped the 1/4″ ply to match the base.


I wanted to cut a semi-circle on one side of the top, and I started by creating a template. The template is useful because I can tweak it as necessary until I’m completely satisfied, then use it to easily cut a perfect match on my workpiece.


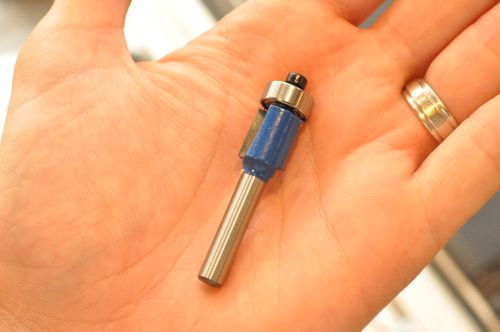
This router bit has a bearing on the end for following templates.


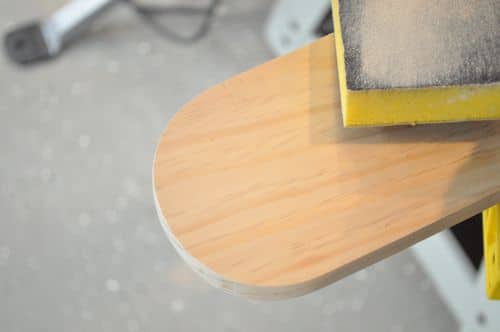
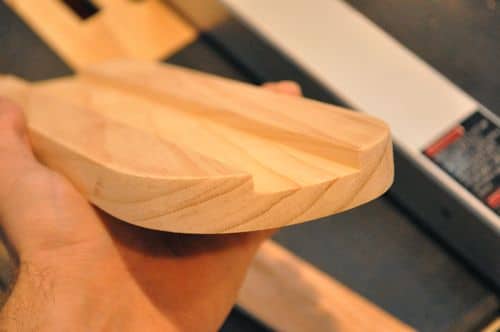
After making a rough cut, I used a palm router and my template to cut a beautiful semi-circle.


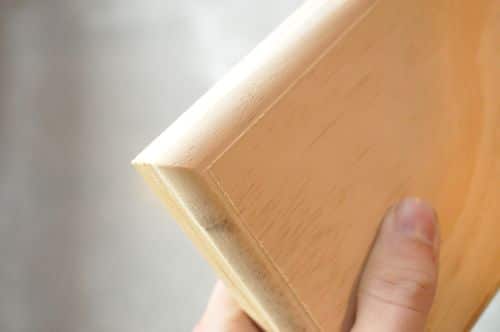
For the base, I used another router bit to cut an eased-edge.


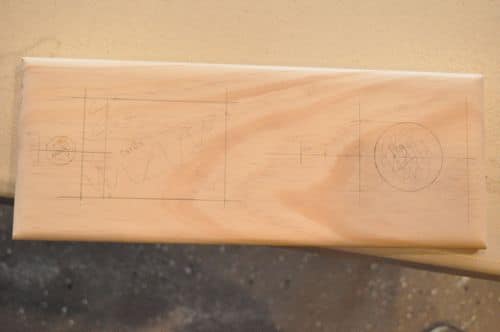
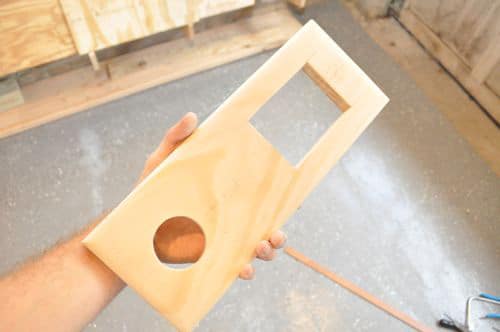
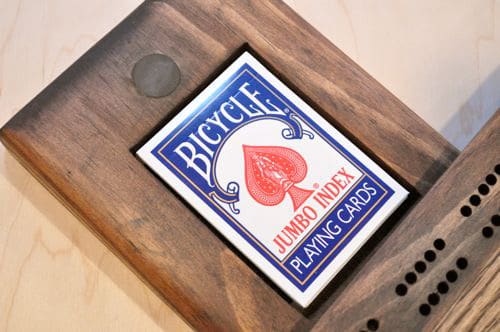
Next, I mapped out the locations for the playing card holder, peg holder, magnet, and swivel pin.


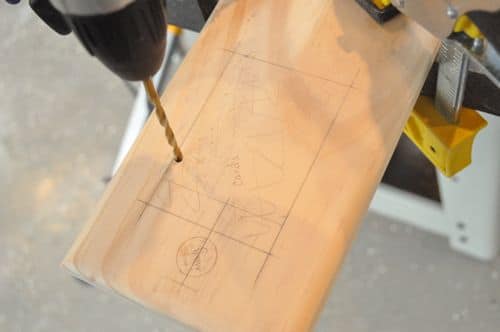
I drilled a starting hole and cut out the playing card and peg holders with my coping saw.


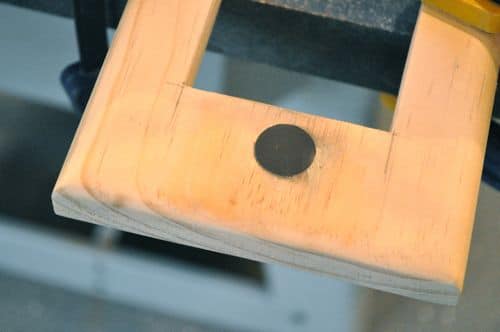
For the magnets, I used my palm router again, setting the depth to match their height. Carefully, I routed the magnet holes on the base and underside of the top.


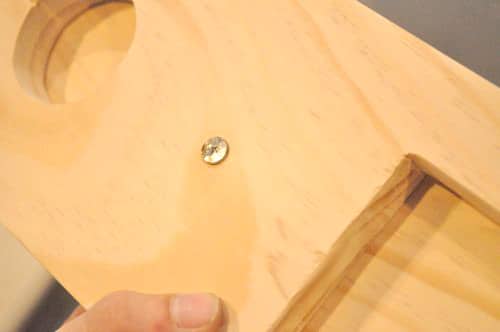
The top and base swivel on a pin to reveal the playing cards and cribbage pegs. Instead of a pin, I cut a machine screw to length and then ground the head as thin as possible. I drilled a hole through the base and part-way through the top.


A nice feature you’ll see on a lot of cribbage boards is a “racing stripe” down the middle. I set up a dado stack on my table saw to cut a channel for the oak inlay.


I made a rough cut for the curve and sanded both ends until the oak was completely flush with the pine top.


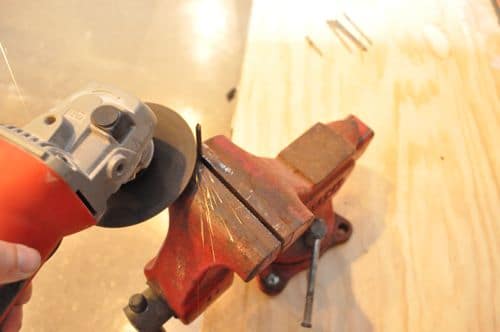
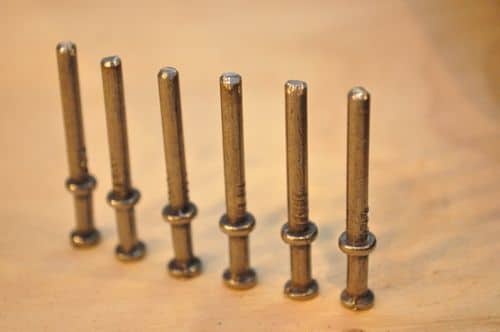
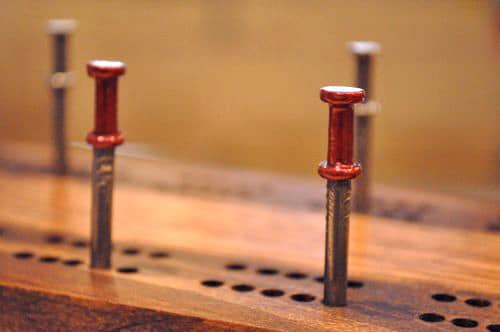
As I mentioned, I used double-headed nails to make the cribbage pegs (spilikins). I cut the nails to length with my angle grinder, and then dressed up the cut edge with a bench-top grinder.


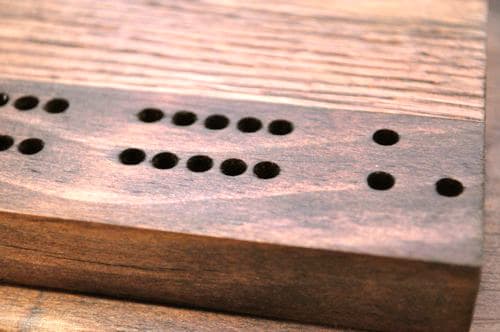
I borrowed a drill press and used a 11/64″ bit to drill all the holes. After taping my template in place, aligning the fence, and setting the depth, things moved pretty quickly. Next, I glued the oak to the top and the 1/4″ plywood to the underside of the base.

I gave everything a final pass with sandpaper to remove any pencil marks or glue. Next, I applied a walnut stain to the entire cribbage board, letting the two different species of wood create some visual interest. To distinguish the pegs, I painted one pair a dark red.

What do you think?


by A MANLY GUEST CONTRIBUTOR

Wednesday, December 26, 2012

How to Make a DIY Surprise Balls

How to Make a DIY Surprise Balls

I’ll never forget the first time I unraveled my first surprise ball. My smile only got bigger and bigger as a glorious pile of brightly colored paper started to form after more and more wonderfully trivial prizes were revealed. By the end, I was left wanting more. So obviously, I had to figure out how to make my own so that I could share the same joy with my friends. Hope you enjoy making these as much as I did!


You’ll need:
fine crepe paper in 10 colors
10 assorted nostalgic candy and toys
dresden trim or glitter (optional)
quick drying glue


Prepare the supplies by cutting the fine crepe paper, lengthwise, into three 1″ strips per color. When picking out the toys, candy, and surprises, be sure to select an assortment of sizes from larger round shaped items to small flat items. Start by wrapping the largest item. Work in a criss cross pattern to cover as much surface area as possible.


After reaching the end of the first strip continue adding 2 more strips of the same color. Put a small dab of glue at the end of the last strip and seal.


Add another larger item and continue wrapping.


Add another item where there may be a space for it – start thinking about where to properly place items in order to form the shape of a ball.


Continue adding items and wrapping . . .


The ball should be taking shape. Save the smaller, flatter item for the last few wraps.


Almost done!


Last wrap!!


Once the ball is finished, decorate the ball with thinner strips and dresden trim.


And you’re finished. They are perfect to stuff stockings with, to give guests as party favors, or to pass around at dinner parties . . . but honestly, does there need to be an excuse to gift someone a surprise ball?!


Posted by Erica

Friday, December 21, 2012

How to Make Your Own Perfume

How to Make Your Own Perfume

1. Use fragrance oils (which are artificially created in a lab and cost around £2 to £5 a bottle) rather than most essential oils (which are pressed from flowers and fruit and are much more expensive – a 500ml bottle of rose essential oils can set you back £800). Orange, other citrus and some herb essential oils (Kirstie used bergamot which is a citrus essential oil) are generally cheaper so it’s worth comparing prices.


Where to Buy Ingredients & Kits:


> SensoryPerfection.co.uk

> Gracefruit.com

> TheSoapKitchen.co.uk

> PlushFolly.com


2. Create your blend by mixing a few drops of oil on a piece of cotton wool until you are happy with the mix. It's a case of trial and error, but Sally finds it helpful to group her notes: floral, woody, green/fresh, fruity, Oriental (spicy) - and have a balance of each of them.


A good blend of different notes gives a perfume structure and depth, which makes it last longer.


3. Once you've created your blend, dilute with perfumer's alcohol. For an eau de toilette blend, go for 10% perfume oils and 90% alcohol. For a stronger parfum blend, go for a 20/80 ratio.


So, for a 50ml bottle of the suggested eau de toilette blend above, you need 5mls of perfume oil blend (35 drops of each of the four notes) and 45mls of alcohol.


For more information on perfume and soap-making courses, products and kits, go to PlushFolly(opens in a new window).com.

Tuesday, December 4, 2012

How to Make Apple Pie in an Apple

How to Make Apple Pie in an Apple

Apple pie may be one of the most classic desserts when it comes to pies in general. But have you ever considered making one inside of the actual apple? Sounds crazy but it's possible and a very delicious experience too. Here's how to make these adorable pies!


 Ingredients


Serves 4:
4 medium apples
4 tbsp white sugar
2 tbsp all purpose flour
1 tsp ground cinnamon
Lemon juice
Chilled pie dough, rolled out about 1/8 inch thick


 Steps

1 Preheat the oven to 350ºF/180ºC.


2 Wash the apples well under cold water. Pat dry with paper towels. Set on a cutting board.


3 Cut a lid into each apple, and remove the tops. With a small sharp knife, carve out the core and seeds (without piercing the bottoms of the apples).


4 Using a small spoon, carefully scrape out the insides of the apple until an apple cup is formed. Save the pulp in a small bowl for the filling.


Rub a tiny bit of lemon juice on the insides of each apple to prevent them from turning brown.


5 Dice and peel the lids very finely. Toss out the stems. Put the peeled and diced lid bits into the pulp bowl.


6 Mix the sugar, flour and ground cinnamon into the apple pulp until well blended.


7 Spoon the filling back into each apple. Fill about 3/4 of the way to prevent spillage of filling while baking.


8 Using a cookie cutter (or knife), cut out apple lid sized circles in the dough, 1 per apple. You can also cut out shapes like leaves, flowers, stars or animals and layer each piece onto the apple to form a crust.


9 Gently lay the crust circles over the apple tops and pinch the edges together much like you would a regular pie to seal the edges. Poke four little holes in the top to allow steam to come through.


10 Bake on a baking sheet for 30-40 minutes or until slightly tender and crust is golden brown.


11 Remove from the oven and allow to cool for about 10 minutes.


12 Serve warm sprinkled with powdered sugar or cinnamon on the tops. Enjoy!


13 Finished.


 Tips

You can add additional ingredients to suit your fancy such as chopped walnuts or mix in a bit of caramel in the filling.

 Things You'll Need

Paper towels
Small spoon for scooping
Cutting board and knife
Cookie cutter (or knife)
Baking sheet

Monday, December 3, 2012

How to Make Corn Nuts

How to Make Corn Nuts

Corn is a staple crop all over the world, and many people are familiar with many foodstuffs made from corn. One of the most popular ways to cook corn is to make corn nuts. Here’s how you can make a great snack with some good-quality corn and some simple ingredients.

What are Corn Nuts?

Corn has been used for thousands of years as a staple grain in the New World. History has it that the Native Americans taught European settlers how to grow and use corn. Corn grains were usually ground into flour using a grindstone or a mortar and pestle.

Fried corn nuts were derived from parched corn, which is similar to popcorn. Along with preserved foods like pemmican and dried meat, parched corn was a food produced by the Native Americans to sustain themselves during travels or winter, when there’s not enough fresh food to go around. Parched corn were large corn kernels allowed to cook, pop, and dry over a bed of hot coals. Corn nuts are prepared in the same way, only that the kernels are fried instead of roasted.
Ingredients

To make corn nuts, you need the following ingredients:

Corn kernels. The corn kernels used in corn nuts are much larger than feed corn or other varieties, like corn on the cob. You can get corn for corn nuts from any feed store.
Oil. As long as you can deep-fry with the oil, then you can use it to cook corn nuts. It’s best to use corn oil, although you can also use coconut oil or vegetable oil. Avoid using olive oil as much as possible. To add flavor to the finished product, you may also use lard or even bacon grease.
Flavoring. Salt is usually used to flavor corn nuts and prevent them from turning insipid. Another way that you can flavor your corn nuts is to add spices to it like chili, garlic powder, or onion powder.
Steps

Here are the steps you need to make corn nuts:

Corn kernels you’ll get from the feed store are dry, so you need to soak them in water to soften them. Soak the kernels in water for about three days in a cool place, like the refrigerator.
Dry the rehydrated corn kernels with paper towels or tea towels.
Heat some oil in a deep fryer or a pan until you see a blue haze form on top of the oil. You may also want to test the heat of the oil by dropping a dry kernel into the liquid. If bubbles form around the corn kernel, the oil is ready.
Drop a heaping tablespoonful of corn kernels into the oil at a time, to allow the kernels to cook through as quickly as possible. Be careful, because some of the corn kernels may pop.
The corn kernels are cooked once they’re golden brown, and if they rise to the surface of the oil. Check the texture of the kernel; if it is crisp to the bite, then you can flavor and serve it immediately. If you’re cooking a large batch, you need to place the cooked corn nuts in a colander lined with paper towels. Season the cooked kernels with salt.

Corn nuts are great for movies, late-night TV, or if you just want something to snack on. With these tips, you can have a great time cooking and eating your own natural corn nuts, without the preservatives and chemicals that come with store-bought varieties. If you enjoy reading this article, you’ll probably eager to learn how to make stove top popcorn and how to grill corn on the cob.

Saturday, December 1, 2012

How To Make Your WordPress Site Multilingual

How To Make Your WordPress Site Multilingual

Most of the people usually ask how to covert their website in some other languages. This post will explain you the easiest way to make your WordPress site multilingual within few minutes. Yes you can easily make your website available to the world with a simple plugin Gtrans. This plugin allows you to power your website with more than 60 languages for free. I have tested this plugin with most of the InkThemes themes and it works amazing.

First of all to download this plugin Click Here

Install this plugin in your WordPress site from dashboard. Now in your dashboard go to “settings” and there you will see “Gtrans” option, click on it. And you will be redirected to Gtrans setting page. The screen will look similar to this:


Here you can set the default language for your website. Now just save settings and you are done with settings. Now its time to integrate this plugin into your website. You can put this plugin anywhere in your WordPress websites in three ways:

1.Through Widgets: This plugin gives you a widget all you need to go to “widget” section and there you will see a widget “Gtrans”. Just drag and drop that widget to any widget area in your website’s theme.


2. Through Shortcode: Yes you can insert this plugin in your wordpress page or post by writing [gtrans] shortcode.

3. Through PHP code: If you want this plugin to appear in your theme’s template files like In header section etc. then you can edit that file and put a code in proper place.

<?php echo do_shortcode(‘[gtrans]‘); ?>

Note: If you don’t know PHP then don’t try this third method.

Now you are done. Refresh your website and you will see the plugin in action. For this tutorial I used InkThemes most popular ColorWay theme and I integrated this plugin in theme’s header section using third methiod described above. It looks like this:


In above picture the default language is set to English, when I changed it to french from the drop down menu it looked like this:


User can change language as per their language, this is the beauty of this plugin.

LinkWithin

Related Posts Plugin for WordPress, Blogger...

Infolinks